How to Load and Save Images in Blazor Image Editor with SQL Server

Syncfusion provides third-party UI components for React, Vue, Angular, JavaScript, Blazor, .NET MAUI, ASP.NET MVC, Core, WinForms, WPF, UWP and Xamarin.
TL;DR: Learn how to load, edit, and save images in a Blazor application using the Blazor Image Editor, a Web API endpoint, and SQL Server for persistent storage. This guide walks through database setup, EF Core modeling, API integration, and using the Image Editor to round‑trip images between the UI and backend.
Many Blazor applications need to store and manage user‑uploaded images such as profile photos, documents, gallery items, product pictures, and more. Developers often struggle with:
Converting images to database-friendly formats.
Moving image bytes between a Web API and the UI.
Persisting edited images.
Reopening images in a client-side editor.
Handling base64, byte arrays, and stream conversions.
This article shows how to store images as binary data in SQL Server LocalDB, retrieve them with C# and EF Core, and load them into the Syncfusion® Blazor Image Editor for editing. The Syncfusion Blazor Image Editor provides built‑in tools for rotating, flipping, zooming, cropping, and annotating images with text, drawings, and shapes. It also includes filters, fine-tuning controls, keyboard shortcuts, and touch-optimized interactions, making it a complete image-editing component for Blazor.
For storage, SQL Server supports BLOB data through types like VARBINARY(MAX), the recommended option since the older IMAGE type is deprecated.
Let’s get started!
Creating a Blazor application
First, create a Blazor WebApp project and install the following NuGet packages in the project, as these packages are prerequisites for connecting to the database:
EntityFramework
Microsoft.EntityFrameworkCore
Microsoft.EntityFrameworkCore.SqlServer
Creating a database in SQL LocalDB
To create the database for the application, follow these steps:
1. Open SQL Server Object Explorer : In Visual Studio, go to the View menu and select SQL Server Object Explorer.
2. Create a new database : In SQL Server Object Explorer, locate the LocalDB server (you may need to expand the node). Right-click on Databases and select Add New Database. Name the new database ImageDB and click OK.
3. Create a new table in ImageDB : Expand the ImageDB database. Right-click on Tables and select Add New Table.
4. Define the table schema: Add a new table named ImageCollections with:
Column | Type | Notes |
Id | NVARCHAR(50) | Primary identifier |
Name | NVARCHAR(50) | Original file name |
ImageData | VARBINARY(MAX) | Image bytes |
5. Save the table using the Update button. This structure stores both metadata and the full image content.
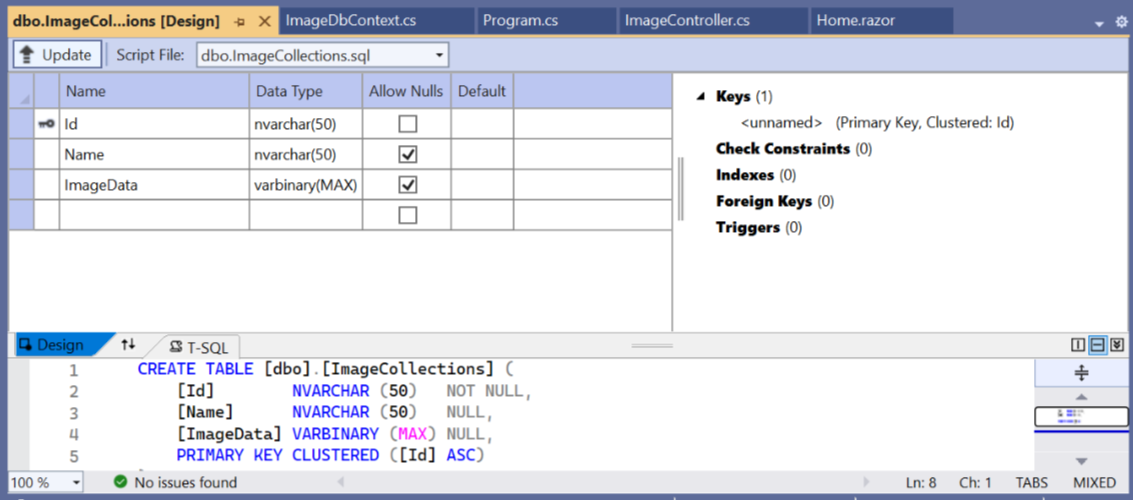
ImageCollections table schema

Sample data stored inside the table
Connecting the database to the application
The ImageCollections table in the ImageDB database stores our image records. To connect the Blazor application to this database, copy the connection string from the ImageDB database properties and add it to the appsettings.json file.
Here’s how you can do it in code:
{
    "AllowedHosts": "*",
    "ConnectionStrings": {
        "ImageDbContext": "Data Source=(localdb)\\MSSQLLocalDB;Initial Catalog=ImageDB;Integrated Security=True;Connect Timeout=30;Encrypt=False;TrustServerCertificate=False;ApplicationIntent=ReadWrite;MultiSubnetFailover=False"
    }
}
Next, create a model class named CustomImageData in the Shared project to represent image data. The class should include properties such as Id for a unique identifier, Name for the image name, Description for a brief description, and ImageData as a byte array to store the image data.
Add this class definition to your project:
public class CustomImageData
{
    public string Id { get; set; }
    public string Name { get; set; }
    public byte[] ImageData { get; set; }
}
Create a DbContext class named ImageDbContext in the Data folder of the Server project. This class should include a DbSet property named ImageCollections that corresponds to the table name in the database, as shown in the code example below.
public class ImageDbContext : DbContext
{
    public ImageDbContext(DbContextOptions<ImageDbContext> options)
        : base(options)
    {
    }

    public DbSet<CustomImageData> ImageCollections { get; set; }
}
At last, register the ImageDbContext in the Program.cs file of the Server project.
// ….
builder.Services.AddControllersWithViews();
builder.Services.AddDbContext<ImageDbContext>(options =>
    options.UseSqlServer(
        builder.Configuration.GetConnectionString("DefaultConnection")
    )
);

// ….
Creating an API Controller
To access and update image data in the database, create an API controller in the Controllers folder of the Server project. Add a new controller class named ImagesController.
This controller exposes two endpoints for managing image data.
The
GETendpoint (api/Images/{id}) retrieves an image from theImageCollectionstable using its unique identifier and returns aNotFoundresponse if the record does not exist.The
PUTendpoint uses the same route to update an existing image with the data provided in the request body. If a matching record is found and the IDs match, the image data is updated and saved; otherwise, a new record is added to the database.
Try this in your project:
using Microsoft.AspNetCore.Mvc;
using BlazorAppDB.Data;
namespace BlazorAppDB.Controller;
{
    [Route("api/[controller]")]
    [ApiController]
    public class ImageController : ControllerBase
    {
        private readonly ImageDbContext _dbContext;

        public ImageController(ImageDbContext dbContext)
        {
            _dbContext = dbContext;
        }

        [HttpPost]
        public IActionResult SaveImage([FromForm] string id, [FromForm] IFormFile imageFile)
        {
            if (string.IsNullOrEmpty(id) || imageFile == null || imageFile.Length == 0)
            {
                return BadRequest("Invalid input");
            }

            using (var memoryStream = new MemoryStream())
            {
                // Copy the uploaded file's content into the memory stream
                imageFile.CopyTo(memoryStream);

                // Convert the memory stream into a byte array
                byte[] imageBytes = memoryStream.ToArray();

                // Check if the image already exists
                var existingImage = _dbContext.ImageCollections.FirstOrDefault(i => i.Id == id);
                if (existingImage != null)
                {
                    // Update existing image
                    existingImage.Name = imageFile.FileName;
                    existingImage.ImageData = imageBytes;
                }
                else
                {
                    // Add new image
                    var imageRecord = new CustomImageData
                    {
                        Id = id,
                        Name = imageFile.FileName,
                        ImageData = imageBytes
                    };
                    _dbContext.ImageCollections.Add(imageRecord);
                }

                _dbContext.SaveChanges();
                return Ok("Image saved successfully");
            }
        }

        [HttpGet("{id}")]
        public IActionResult LoadImage(string id)
        {
            var image = _dbContext.ImageCollections.FirstOrDefault(i => i.Id == id);
            if (image == null)
            {
                return NotFound("Image not found");
            }

            // Convert the byte array to a Base64 string
            var base64Image = Convert.ToBase64String(image.ImageData);
            return Ok(base64Image);
        }
    }
}
To work with the API controller, set up the configuration below in the Program.cs file.
// ……
builder.Services.AddControllers();
builder.Services.AddControllersWithViews();
builder.Services.AddServerSideBlazor()
    .AddHubOptions(o =>
    {
        o.MaximumReceiveMessageSize = 102400000;
    });

// …..

app.UseRouting();
app.UseAntiforgery();
app.UseEndpoints(endpoints =>
{
    endpoints.MapControllers();
});
Designing the user interface
After setting up the backend, configure the user interface to load and save images using the Image Editor and SQL Server LocalDB. Ensure the correct port number from launchSettings.json in the Client project is used in the GetAsync and PutAsync methods.
You can now render the Image Editor component on the page and enable loading and saving images to the database. For detailed information about the Image Editor component, you can refer to the getting started page. Once the Image Editor is rendered, define two asynchronous methods, LoadImageFromDB and SaveImageToDB, to manage image data with a web API.
The
LoadImageFromDBmethod fetches image data from an API endpoint using an HTTP GET request, deserializes the response into aCustomImageDataobject, and opens the image in an Image Editor component using abase64string if the image data is present.The
SaveImageToDBmethod retrieves image data from the Image Editor through theGetImageDataAsync method, which returns a byte array. This byte array is then used to create a CustomImageData object. The object is serialized to JSON and sent to the API using an HTTP PUT request to update the image data in the database. This setup allows for loading an image from the database and saving edited image data back to the database.
You can now load any image into the image editor, make modifications, and click the Save Image to DB button to save the edited image to the database. The saved, modified image can then be reloaded into the image editor by clicking the “Load Image from DB” button.
Below is the code you need:
@page "/"
@using Newtonsoft.Json
@using Syncfusion.Blazor.Buttons
@using Syncfusion.Blazor.ImageEditor
@using System.Text;
@using System.Net.Http
@using System.Net.Http.Headers
@using System.Threading.Tasks
@inject HttpClient HttpClient

<SfImageEditor @ref="imageEditor" Height="550px" />
<SfButton @onclick="SaveImageToDB">Save Image to DB</SfButton>
<SfButton @onclick="LoadImageFromDB">Load Image from DB</SfButton>

@code {
    private SfImageEditor imageEditor;

    // Method to load image from the database
    public async Task LoadImageFromDB()
    {
        var response = await HttpClient.GetAsync("https://localhost:7127/api/image/1");
        if (response.IsSuccessStatusCode)
        {
            var base64Image = await response.Content.ReadAsStringAsync();
            if (!string.IsNullOrEmpty(base64Image))
            {
                await imageEditor.OpenAsync($"data:image/png;base64,{base64Image}");
            }
        }
    }

    // Method to save the image to the database
    public async Task SaveImageToDB()
    {
        if (imageEditor != null)
        {
            var imageBytes = await imageEditor.GetImageDataAsync();
            if (imageBytes != null)
            {
                var formData = new MultipartFormDataContent();
                var imageContent = new ByteArrayContent(imageBytes);
                imageContent.Headers.ContentType = MediaTypeHeaderValue.Parse("image/png");
                formData.Add(imageContent, "imageFile", "image.png");
                formData.Add(new StringContent("1"), "id"); // ID for the image

                var response = await HttpClient.PostAsync("https://localhost:7127/api/image", formData);
                if (response.IsSuccessStatusCode)
                {
                    Console.WriteLine("Image saved successfully");
                }
                else
                {
                    Console.WriteLine($"Error saving image: {response.ReasonPhrase}");
                }
            }
        }
    }
}
To work with the Syncfusion Blazor component, set up the configuration in the Program.cs file as shown below.
using Syncfusion.Blazor
// ……

builder.Services.AddSyncfusionBlazor();

// ……
The GIF below demonstrates image editing, saving, and loading from the database.
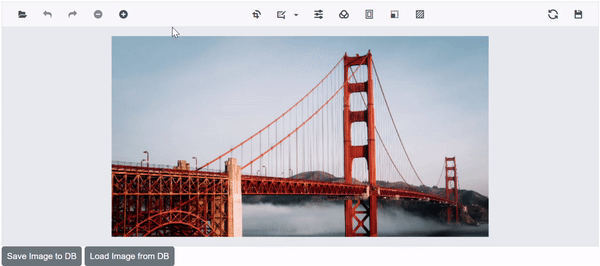
Loading, editing, and saving images from SQL server in the Blazor Image Editor
GitHub reference
For more insights, check out the Load and Save Images in Blazor Image Editor from Database sample on the GitHub.
Frequently Asked Questions
Q1: How can I load an image from a database into a Blazor Image Editor?
You can load an image by retrieving it from the database as a byte array (byte[]) or Base64 string , then converting it into an image source that the Blazor Image Editor supports (such as a Base64 data URL). The image is then assigned to the editor’s source property during component initialization or via an API call.
Q2: What image format should be stored in the database for use with Blazor Image Editor?
It’s recommended to store images as byte arrays (VARBINARY) in the database. This approach is efficient, secure, and allows easy conversion to Base64 when loading the image into the Blazor Image Editor.
Q3: How do I save the edited image back to the database?
After editing, you can export the image from the Blazor Image Editor as a Base64 string or byte array. This output can then be converted as needed and saved back to the database using your backend service or API.
Q4: Can I load images dynamically without refreshing the page?
Yes. Blazor supports dynamic data binding , so you can load or replace images in the Image Editor at runtime, such as when selecting different records, without reloading the page. This works seamlessly in both Blazor Server and Blazor WebAssembly.
Conclusion
Thank you for reading! A complete image-editing workflow in Blazor becomes far simpler with the Syncfusion Blazor Image Editor. With SQL Server as the backend and a clean Web API layer, you can load, edit, and persist images reliably, without hand‑coding complex UI behavior.
This approach improves maintainability, reduces UI bugs, and gives developers a production-grade workflow for handling image content in modern Blazor apps. If you’re exploring robust UI components for Blazor projects, the Image Editor is a strong option worth evaluating.
If you’re a Syncfusion user, you can download the setup from the license and downloads page. Otherwise, you can download a free 30-day trial.
You can also contact us through our support forum, support portal, or feedback portal for queries. We are always happy to assist you!
This article was originally published at Syncfusion.com.


